스프링 프레임워크로 홈페이지를 구축할 때
많은 양의 데이터때문에 가독성이 떨어질 수 있다.
많은 페이징 처리가 있지만
자바클래스와 데이터베이스를 이용하여
페이징처리를 한다.
페이징 처리를 위해 페이지 기준을 잡을 클래스를 작성한다.
<Criteria.java>
package com.portfolio.biz.utils;

public class Criteria {
	private int pageNum;
	private int numPerPage;

	public Criteria() {
		this(1, 10);
	}

	public Criteria(int pageNum, int numPerPage) {
		this.pageNum = pageNum;
		this.numPerPage = numPerPage;
	}

	public int getPageNum() {
		return pageNum;
	}

	public void setpageNum(int pageNum) {
		if (pageNum <= 0) {
			this.pageNum = 1;
		} else {
			this.pageNum = pageNum;
		}

		this.pageNum = pageNum;
	}

	public int getnumPerPage() {
		return numPerPage;
	}

	public void setnumPerPage(int numPerPage) {
		if (numPerPage <= 0 || numPerPage > 30) {
			this.numPerPage = 30;
		} else {
			this.numPerPage = numPerPage;
		}

		this.numPerPage = numPerPage;
	}

	public int getStartPage() {
		return (this.pageNum - 1) * this.numPerPage + 1;
	}

	@Override
	public String toString() {
		return "Criteria [pageNum=" + pageNum + ", numPerPage=" + numPerPage + "]";
	}
}
그리고 페이지 처리해줄 로직을 작성한다.
<PageMaker.java>
package com.portfolio.biz.utils;

import org.springframework.web.util.UriComponents;
import org.springframework.web.util.UriComponentsBuilder;

public class PageMaker {
	private Criteria cri;

	private int totalCount; // 전체 데이터 수
	private int startPage;
	private int endPage;
	private boolean prev;
	private boolean next;

	private int displayPageNum = 10;
	private int realEndPage;

	public Criteria getCri() {
		return cri;
	}
	public void setCri(Criteria cri) {
		this.cri = cri;
	}
	public int getTotalCount() {
		return totalCount;
	}
	public void setTotalCount(int totalCount) {
		this.totalCount = totalCount;

		memberInit();
	}

	public void memberInit() {
		endPage = (int)(Math.ceil(cri.getPageNum()/(double)displayPageNum)) * displayPageNum;

		startPage = endPage - displayPageNum + 1;

		realEndPage = (int)(Math.ceil(totalCount/(double)cri.getnumPerPage()));

		if(endPage > realEndPage) {
			endPage = realEndPage;
		}

		prev = (startPage == 1 ? false : true);

		next = totalCount > (endPage * cri.getnumPerPage()) ? true : false;
	}

	public String makeQuery(int page) {
		UriComponents uriComp = UriComponentsBuilder.newInstance().queryParam("pageNum", page).queryParam("numPerPage", cri.getnumPerPage()).build();

		return uriComp.toString();
	}

	public int getStartPage() {
		return startPage;
	}
	public void setStartPage(int startPage) {
		this.startPage = startPage;
	}
	public int getEndPage() {
		return endPage;
	}
	public void setEndPage(int endPage) {
		this.endPage = endPage;
	}
	public boolean isPrev() {
		return prev;
	}
	public void setPrev(boolean prev) {
		this.prev = prev;
	}
	public boolean isNext() {
		return next;
	}
	public void setNext(boolean next) {
		this.next = next;
	}
	public int getDisplayPageNum() {
		return displayPageNum;
	}
	public void setDisplayPageNum(int displayPageNum) {
		this.displayPageNum = displayPageNum;
	}
	public int getRealEndPage() {
		return realEndPage;
	}
	public void setRealEndPage(int realEndPage) {
		this.realEndPage = realEndPage;
	}
}
그런 다음에 데이터를 가져올 쿼리를 작성한다.
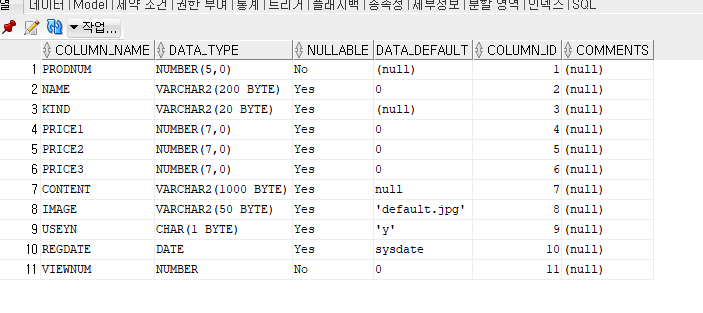
편의상 기존에 만들어 둔 상품테이블에서 데이터를 가져온다.

<?xml version="1.0" encoding="UTF-8"?>
<!DOCTYPE mapper PUBLIC "-//mybatis.org//DTD Mapper 3.0//EN" "http://mybatis.org/dtd/mybatis-3-mapper.dtd">
<mapper namespace="ProductDAO">

	<select id="getProductListPaging" parameterType="hashMap" resultType="product">
	<![CDATA[
		select rn, prodnum, name, kind, price1, price2, price3, content, image, useyn, regdate, viewnum
    from (select row_number() over (order by regdate desc) rn, prodnum, name, kind, price1, price2, price3, content, image, useyn, regdate, viewnum
            from product
            where kind like '%' || #{kind} || '%'
            order by regdate desc)
            where rn > ((#{criteria.pageNum}-1) * #{criteria.numPerPage}) and rn <= #{criteria.pageNum} * #{criteria.numPerPage}
            ]]>
	</select>

    <select id="countProductList" parameterType="String" resultType="int">
		select count(*) from product where kind like '%' || #{kind} || '%'
	</select>

</mapper>
Mybatis를 이용하여 mapper파일을 작성할 때 주의할 점은 부등호(<,>)작성할 때 주의해야한다.
그냥 부등호가 있는 쿼리는 작성하면 파일에서 태그로 인식하기 때문에
<![CDATA[ --query-- ]]> 태그를 사용해서 쿼리를 작성해야한다.
그리고 데이터 입력할 때 다른 형태 2개의 데이터를 입력해야하므로
hashMap형태로 데이터를 입력해줘야한다.
그리고 쿼리를 작성할 때 오라클의 함수인
row_number() over (조건) 컬럼 이름
을 사용하여 데이터를 열의 넘버링을 사용하여 가져올 수 있게 작성하였다.
그리고 총 데이터의 갯수를 알아야하기 때문에
count(*)함수를 이용해서 열의 갯수를 가져온다.
<ProductDAO.java>
package com.portfolio.biz.product.impl;

import java.util.HashMap;
import java.util.List;

import org.mybatis.spring.SqlSessionTemplate;
import org.springframework.beans.factory.annotation.Autowired;
import org.springframework.stereotype.Repository;

import com.portfolio.biz.product.dto.ProductVO;
import com.portfolio.biz.utils.Criteria;

@Repository
public class ProductDAO {
	@Autowired
	private SqlSessionTemplate mybatis;

	public List<ProductVO> getProductListPaging(String kind, Criteria criteria){
		System.out.println("==> Mybatis로 getProductListPaging() 기능 처리");

		HashMap<String, Object> map = new HashMap<>();
		map.put("kind", kind);
		map.put("criteria", criteria);
		return mybatis.selectList("ProductDAO.getProductListPaging", map);
	}

	public int countProductList(String kind) {
		System.out.println("==> Mybatis로 countProductList() 기능 처리");
		return mybatis.selectOne("ProductDAO.countProductList", kind);
	}
}
페이징처리하는 쿼리에 넣어줄 데이터를 해쉬맵 형태로 작성한다.
Criteria 클래스를 import해서 데이터를 넣어준다.
<ProductService.java>
package com.portfolio.biz.product;

import java.util.List;

import com.portfolio.biz.product.dto.ProductVO;
import com.portfolio.biz.utils.Criteria;

public interface ProductService {

	List<ProductVO> getProductListPaging(String kind, Criteria criteria);

	int countProductList(String kind);

}
<ProductServiceImpl.java>
package com.portfolio.biz.product.impl;

import java.util.List;

import org.springframework.beans.factory.annotation.Autowired;
import org.springframework.stereotype.Service;

import com.portfolio.biz.product.ProductService;
import com.portfolio.biz.product.dto.ProductVO;
import com.portfolio.biz.utils.Criteria;

@Service("productService")
public class ProductServiceImpl implements ProductService {

	@Autowired
	private ProductDAO productDAO;

	@Override
	public List<ProductVO> getProductListPaging(String kind, Criteria criteria) {
		return productDAO.getProductListPaging(kind, criteria);
	}

	@Override
	public int countProductList(String kind) {
		return productDAO.countProductList(kind);
	}
}
그리고 페이징 처리를 해줄 부분을 작성한다.
<product_paging.jsp>
<%@taglib uri="http://java.sun.com/jsp/jstl/core" prefix="c"%>

<div class="text-center">
	<ul class="pagination justify-content-center">

		<c:if test="${pageMaker.prev }">
			<li class="page-item"><a class="page-link"
				href="admin_product_list${pageMaker.makeQuery(pageMaker.startPage-1) }">Prev</a></li>
		</c:if>

		<c:forEach begin="${pageMaker.startPage }" end="${pageMaker.endPage }"
			var="index">
			<li class="page-item"><a class="page-link"
				href="admin_product_list${pageMaker.makeQuery(index) }">${index }</a></li>
		</c:forEach>

		<c:if test="${pageMaker.next }">
			<li class="page-item"><a class="page-link"
				href="admin_product_list${pageMaker.makeQuery(pageMaker.endPage+1) }">Next</a></li>
		</c:if>
	</ul>
</div>
<script
	src="https://cdnjs.cloudflare.com/ajax/libs/popper.js/1.14.3/umd/popper.min.js"></script>
<script
	src="https://stackpath.bootstrapcdn.com/bootstrap/4.1.3/js/bootstrap.min.js"></script>
pageMaker.mekequery 부분은
pageMaker를 작성하면서 UriCompnentBuilder를 이용한 부분이다.
UriCompnentBuilder를 사용하면 자바 내부에서 자체적으로 쿼리를 작성해서 결과값을 내보내주는데
페이지 뒷 부분 ?(물음표)로 시작하는 부분부터 작성해준다.
그리고 부트스트랩에서 제공해주는 css를 사용하여 페이징부분(보통 pagination이라고 한다.)을 꾸밀 수 있다.
리스트 형식으로 페이징을 만들 수 있다.
(간혹 이것저것 갖다붙여서 작성하다가 페이지가 안 넘어갈때가 있다. 그럴때에는 jquery부분이 중복됐는지 확인해보는 것이 좋다.)
<productlist.jsp>
<%@ page language="java" contentType="text/html; charset=UTF-8"
    pageEncoding="UTF-8"%>
    <%@taglib uri="http://java.sun.com/jsp/jstl/core" prefix="c" %>
    <%@taglib uri="http://java.sun.com/jsp/jstl/fmt" prefix="fmt" %>
<!DOCTYPE html>
<html>
<head>
<meta charset="UTF-8">
<title>Jamesy Product List</title>
</head>
<body>
<div id="wrapper">

	<!-- Coontent Wrapper -->
	<div id="content-wrapper" class="d-flex felx-cloumn">
		<%@include file="../sidebar.jsp" %>

		<!-- Main Content -->
		<div id="content">
			<%@include file="../topbar.jsp" %>

			<!-- Begin Page Content -->
			<div class="container-fluid">

				<!-- Page Heading -->
				<h1 class="h3 mb-2 text-grey-800">Product</h1>
				<p>DataTables is a third party plugin that is used to generate the demo table below.
                        For more information about DataTables, please visit the </p>

                <!-- DataTable -->
                <div class="card shadow mb-4">
                	<div class="card-header py-3">
                		<h6 class="m-0 font-weight-bold text-primary">Product List</h6>
                	</div>
                	<div class="card-body">
                		<div class="table-respnsive col-lg-12">
                			<table class="table table-bordered" id="dataTable" width="100%" cellsapcing="0">
                				<thead>
                					<tr>
                						<th>No.</th>
                						<th>Name</th>
                						<th>Kind</th>
                						<th>Price</th>
                						<th>Status</th>
                						<th>Date</th>
                					</tr>
                				</thead>
                				<tfoot>
                					<tr>
                						<th>No.</th>
                						<th>Name</th>
                						<th>Kind</th>
                						<th>Price</th>
                						<th>Status</th>
                						<th>Date</th>
                					</tr>
                				</tfoot>
                				<tbody>
                					<c:forEach items="${productList }" var="productList">
                						<tr>
                							<td>${productList.prodnum }</td>
                							<td><a href="admin_product_detail?prodnum=${productList.prodnum }">${productList.name }</a></td>
                							<td>${productList.kind }</td>
                							<td><fmt:formatNumber value="${productList.price2 }"/></td>
                							<td>
                								<c:choose>
                									<c:when test="${productList.useyn == 'n' }"><span class="text-danger">판매취소</span></c:when>
                									<c:otherwise><label class="text-info">판매중</label></c:otherwise>
                								</c:choose>
                							</td>
                							<td><fmt:formatDate value="${productList.regdate }"/></td>
                						</tr>
                					</c:forEach>
                				</tbody>
                			</table>
                		</div>
                		<%@include file="product_paging.jsp" %>
                	</div>
                </div>
			</div>
		</div>

	</div>

</div>

<%@include file="../footer.jsp"%>
위에서 만든 페이징 파일을 <%@include %>로 해당 파일에 들어갈 수 있게한다.
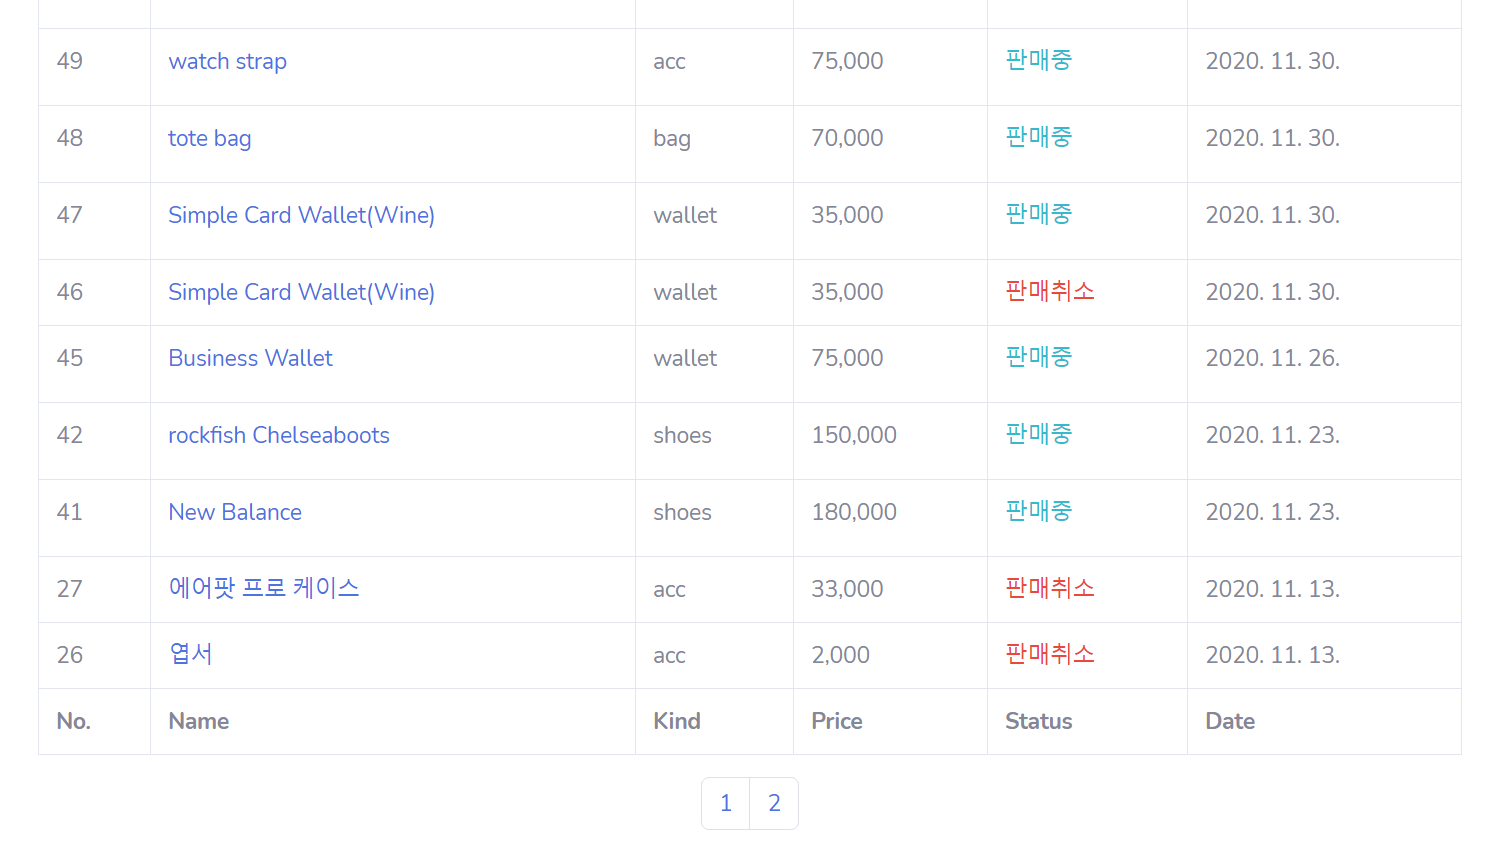
그러면 페이징처리된 것을 볼 수 있다.

'포트폴리오 > Spring Framework' 카테고리의 다른 글
| 스프링 프레임워크 - 관리자 상품 등록하기 (0) | 2020.12.08 |
|---|---|
| 스프링 프레임 워크 - 사진 업로드, 여러장 사진 업로드 (0) | 2020.12.08 |
| 스프링 프레임워크 - 관리자 로그인 (0) | 2020.12.07 |
| 스프링 프레임워크 - 로그인 하기(아이디 찾기, 비밀번호 찾기) (1) | 2020.12.01 |
| 스프링 프레임워크 - 회원가입 페이지 만들기 - 2 (0) | 2020.12.01 |


